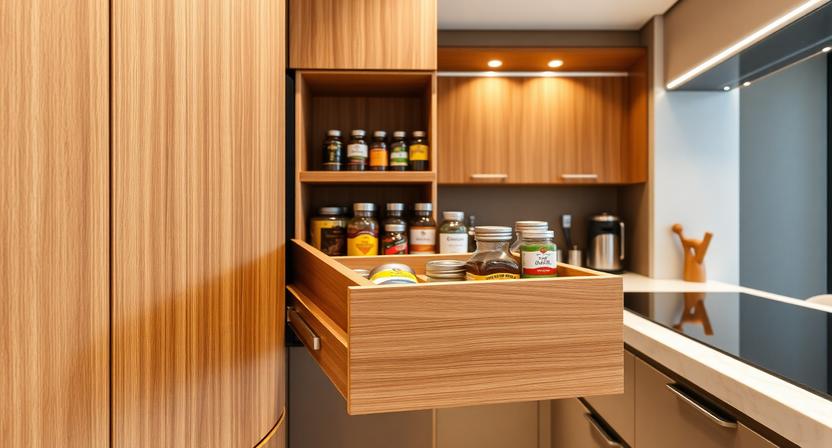
Optimizing narrow gaps with a premium wood side basket for 260mm cabinet spaces transforms underutilized kitchen areas into highly accessible, high-capacity storage zones.
By integrating soft-close runners and durable solid wood trays, these compact organizer systems keep cooking oils, spice jars, and premium condiments within arm’s reach. This comprehensive expert guide delivers the technical blueprints, installation step-by-steps, and maintenance practices required to maximize your culinary storage efficiency.
Technical Breakdown of a Wood Side Basket for 260mm Cabinet Setups
Integrating a wood side basket for 260mm cabinet layouts requires a clear understanding of physical dimensions, clear openings, and structural configurations. A standard 260mm external cabinet width typically translates to an internal clear carcass width of approximately 222mm to 224mm, assuming standard 18mm side panels.
Hardware manufacturers design these specialized slim pull-out systems to slide effortlessly within these exact tolerances without rubbing against the interior woodwork.
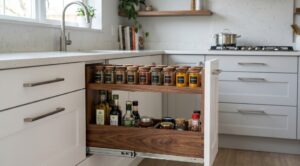
The primary mounting system for a narrow wood side basket relies on heavy-duty side-mount or base-mount runner configurations. Side-mount setups attach securely to one inner vertical wall of the cabinet, which provides maximum stability for tall, top-heavy condiment bottles.
Conversely, under-mount hidden tracks sit completely beneath the bottom wooden tray, hiding the metallic components from view and providing a cleaner aesthetic.
Selecting high-quality solid wood trays ensures the system resists the structural sagging commonly associated with cheap wire alternatives.
Premium hardwood components are treated with moisture-resistant sealants to withstand the high humidity levels found in urban kitchens across Dhaka and Chattogram. When paired with synchronized soft-closing runners, the basket glides silently and eliminates the risk of heavy spice bottles rattling or tipping over during rapid movements.
Solving the Core Search Intent: Step-by-Step Selection and Planning
1. Measure the Internal Carcass Deeply
Never buy hardware based on external cabinet dimensions or guesswork. Open your cabinet door completely and measure the internal clear width, clear depth, and clear height at three different points to account for any structural warping. For a standard wood side basket for 260mm cabinet installations, you require a minimum internal depth of 450mm to 500mm to accommodate full-extension industrial runners.
2. Verify Door Hinge Clearances
If your cabinet uses standard overlay hinges, ensure the hinge mechanisms do not protrude into the path of the pull-out basket. Many modern modular kitchen accessories require a zero-protrusion hinge or a small spacer block mounted behind the runner tracks. This minor adjustment ensures that when you pull the wooden basket forward, the side panel completely clears the open cabinet door without scratching the finish.
3. Assess the Weight and Loading Requirements
Calculate the approximate total weight of the glass bottles, vinegar jars, and heavy spice containers you plan to store. Standard slim side baskets feature load ratings ranging from 15kg to 25kg depending on the runner grade. Choosing a system equipped with synchronized steel ball-bearing runners prevents the drawer from binding or catching when fully extended under maximum load capacity.
Practical Space-Saving Benefits for Bangladeshi Apartments
Optimizing constrained layouts in modern flats throughout Bangladesh requires utilizing every millimeter of vertical and horizontal room. Traditional deep shelving makes reaching items at the back incredibly tedious, often resulting in forgotten, expired ingredients. A specialized smart kitchen organizer brings the entire depth of your cabinetry directly into the light with a single, effortless pull.
These narrow storage systems are exceptionally well-suited for the small gaps found near cooking hobs and built-in gas stoves. Homeowners frequently use these slim zones to store high-use culinary items like mustard oil, ghee pots, and traditional spice blends. Keeping these items organized vertically frees up premium countertop real estate, facilitating a safer and cleaner meal preparation workflow.
Furthermore, utilizing custom wooden fittings enhances the overall interior aesthetic of your home, replacing industrial-looking wire baskets with warm, organic textures. The premium wood components act as natural dampeners, reducing the clattering noise of glass jars during daily food preparation. This combination of structural strength and visual refinement elevates the value of modern urban properties.
Material Standards and Structural Component Lifespans
| Component Type | Material Standard | Why It Matters | Expected Lifespan |
| Storage Tray | Premium Solid Wood | Offers a luxurious appearance, excellent durability, and enhances the overall aesthetics of the storage unit. | 10+ Years |
| Runner System | Soft-Close Steel | Ensures smooth and silent opening and closing while reducing wear from repeated use. | 8–10 Years |
| Mounting Bracket | Heavy-Duty Iron | Provides strong structural support, prevents sagging, and maintains stability under heavy loads. | 15+ Years |
Evaluating the material thickness of the underlying runner systems is essential before finalizing your layout upgrades. Premium hardware utilizes galvanized or powder-coated steel tracks that protect against rust in humid tropical climates. Ensuring the wooden trays are crafted from seasoned timber avoids the risk of warping when exposed to ambient kitchen heat and steam.
Step-by-Step Installation Guide for Single Side Mount Systems
Achieving a flush, perfectly aligned finish requires patience, a precise spirit level, and the proper sequence of installation steps. Before drilling, clear the cabinet space entirely and inspect the inner walls for any hidden electrical conduits or water lines.
- Unbox the runner mechanism and separate the cabinet tracks from the main wooden basket frame by depressing the release triggers.
- Mark the exact screw hole positions on the interior side wall using a sharp pencil and a pocket spirit level to guarantee perfect horizontal alignment.
- Pre-drill minor pilot holes into the wood panels using a 2mm drill bit to prevent the melamine or laminate coating from cracking.
- Securely screw the main runner tracks into place using premium wood screws, ensuring they sit perfectly parallel to each other.
- Mount the wooden basket back onto the extended tracks until you hear an audible click confirming the locking tabs are fully engaged.
- Attach the front cabinet door panel to the adjustable door-mount brackets, tweaking the alignment screws until the door sits completely flush.
If the movement feels stiff or tight after mounting, slightly loosen the primary mounting screws to adjust the internal track alignment. A perfectly installed system should glide smoothly with minimal physical effort and close silently using the built-in hydraulic soft-close cylinders.
Pro Tip: Always measure the internal clear width, depth, and height of your cabinet carcass rather than relying on external woodwork dimensions to ensure a flawless hardware fit.
Common Installation Mistakes and Quick Troubleshooting Fixes
One prevalent issue during DIY assembly is neglecting to check if the cabinet carcass itself is perfectly level and plumb. If the entire wardrobe leans slightly forward or sideways, the pull-out side basket may drift open on its own or slide back aggressively. Install small plastic shims behind the runner brackets to counteract any minor structural misalignments in the underlying home masonry.
Another common mistake is overcrowding the vertical shelves beyond their designated weight ratings, causing the tracks to sag. When runners sag, the lower edge of the wooden basket rubs against the bottom base panel of the cabinet carcass. To fix this, reduce the weight load immediately and adjust the vertical position screws on the door brackets to raise the drawer face.
Finally, using incorrect screw sizes can permanently damage your premium modular cabinetry or pierce through the external finished panels. Always verify that the length of the mounting screws is shorter than the thickness of your cabinet partition walls. If your partition wall is 18mm thick, use 15mm or 16mm wood screws to guarantee a secure bite without causing exterior bulges.
Long-Term Maintenance and Care for Hardwood Kitchen Inserts
Maintaining the pristine finish of natural wood organizational inserts requires a gentle, chemical-free routine.
Never wash wooden trays directly under running tap water or submerge them, as excessive moisture causes natural wood grains to swell, warp, and split. Instead, wipe the internal surfaces weekly using a clean microfiber cloth slightly dampened with a mild soapy solution.
In busy cooking environments, accidental spills of aggressive ingredients like mustard oil, dark soy sauce, or vinegar are bound to happen.
Clean up these spills immediately using an absorbent paper towel to prevent permanent deep stains from penetrating the protective top coat. Allowing liquids to sit overnight can soften the wood adhesives and lead to premature structural delamination.
To preserve the deep, natural luster of the timber and maintain its moisture barrier, apply a thin coat of food-safe mineral oil once a year.
Rub the oil gently along the direction of the wood grain using a lint-free cloth, allowing it to soak in completely for several hours. This simple maintenance step seals the pores against ambient humidity and prevents the wood from drying out due to heat exposure.
Future Innovations in Smart Kitchen Storage Solutions
The residential design market across major cities is rapidly shifting toward integrated smart home ecosystems and hidden spatial mechanics.
Homeowners are increasingly replacing traditional bulky setups with touch-to-open electronic drive systems that eliminate the need for external door handles. A gentle tap with your knee or hand triggers an electric motor that smoothly projects the internal wood side basket outward.
Another emerging trend is the integration of modular, adjustable internal dividers within the wooden trays themselves.
These magnetic or click-lock divider bars allow users to reconfigure their storage slots based on changing grocery needs over time. This high level of customization ensures that smaller items like medicine bottles or small spice pods remain completely stable during movement.
Sustainable material choices are also shaping the future of premium compact cabinet fittings BD layouts.
Manufacturers are sourcing certified sustainable hardwoods and eco-friendly bamboo composites that offer exceptional natural water resistance. Combining these green materials with non-toxic, VOC-free protective sealants ensures a healthier indoor cooking environment for modern conscious households.
Comparing Diverse Modular Kitchen Accessories
When planning a comprehensive layout overhaul, it is helpful to look at how a wood side basket for 260mm cabinet setups compares to other high-utility storage systems. Choosing the right mix of hardware ensures that no corner or gap goes completely wasted.
Maximizing Corner Cabinets and Deep Spaces
Deep corner cabinets are notorious for becoming cluttered graveyard zones where plastic containers go missing. Utilizing specialized rotating carousels or heavy-duty blind corner units brings those hidden items forward with a simple pull. These larger systems handle heavy pots and pans, while narrow side baskets take care of smaller, high-frequency cooking essentials.
Utilizing Vertical Wall Tracks and Open Racks
If your base cabinet space is fully utilized, extending your storage vertically onto open walls is an effective alternative. Installing modular wall matrix tracks keeps ladles, scissors, and cutting boards floating neatly above the main counter space. This layout strategy works in tandem with base cabinet pull-outs to establish a highly organized, bi-level workspace.
Optimizing Deep Under-Sink Areas
The damp zone beneath the kitchen sink often goes unused due to complicated drainage pipes and water filters. Installing U-shaped under-sink baskets allows you to navigate around plumbing obstacles while recapturing valuable storage space for cleaning detergents. Integrating these specialized systems alongside kitchen storage solutions from Bangladesh suppliers completes a comprehensive home organization strategy.
A functional kitchen makes everyday cooking easier and more enjoyable. Choosing well-designed kitchen appliances and storage solutions helps create a space that stays efficient and organized for years.
Inline Contextual Changes
- Original: “Integrating a high-quality wood side basket for 260mm cabinet frames allows you to utilize narrow gaps that would otherwise go completely waste.”
- Updated: “Integrating a high-quality wood side basket for 260mm cabinet frames allows you to utilize narrow gaps that would otherwise go completely waste.”
- Exact Anchor: wood side basket for 260mm cabinet
- Anchor URL: https://kitchenparkbd.com/product/side-basket-for-260mm-cabinet/
- Original: “Implementing these compact cabinet fittings BD solutions keeps your environment organized.”
- Updated: “Implementing these compact cabinet fittings BD solutions keeps your environment organized.”
- Exact Anchor: compact cabinet fittings BD
- Anchor URL: https://kitchenparkbd.com/product/side-basket-for-150-200-250-300mm-cabinet/
- Original: “Choosing recognized kitchen storage solutions from Bangladesh brands guarantees that you receive certified materials designed to provide exceptional long-term value…”
- Updated: “Choosing recognized kitchen storage solutions from Bangladesh brands guarantees that you receive certified materials designed to provide exceptional long-term value…”
- Exact Anchor: kitchen storage solutions from Bangladesh
- Anchor URL: https://kitchenparkbd.com/product/pull-out-drawer-basket-price-in-bangladesh/
- Original: “Investing in premium modular kitchen accessories ensures that no corner of your room is left unusable, maximizing every square inch of your floor plan.”
- Updated: “Investing in premium modular kitchen accessories ensures that no corner of your room is left unusable, maximizing every square inch of your floor plan.”
- Exact Anchor: modular kitchen accessories
- Anchor URL: https://kitchenparkbd.com/product/3-sided-basket-for-cabinet-price-in-bangladesh/
Final Footer Block
Next Steps & Resource Directories
Browse Full Directories
[Main Hub] > Side Basket for 260mm Cabinet