
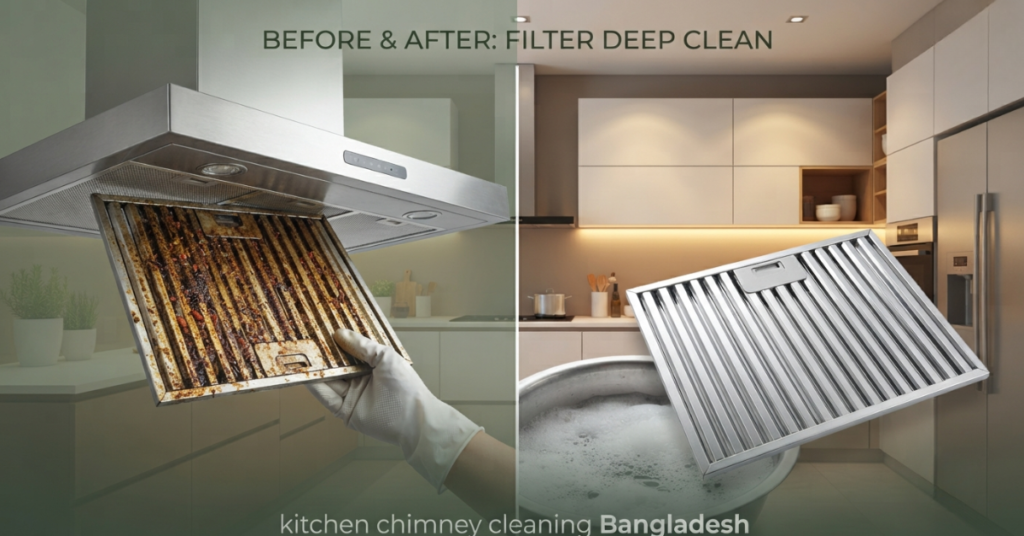
Proper cooker hood maintenance prevents stubborn oil accumulation, restores motor suction, and protects your overhead cabinets from sticky residue caused by high-heat spice frying.
Routine cleaning of baffle filters, auto-clean collector cups, and blower wheels extends the lifespan of your unit while maintaining optimal indoor air quality.
Following a structured schedule ensures your kitchen remains smoke-free, hygienic, and fire-safe.
Comprehensive Step-by-Step Cooker Hood Maintenance Protocol
Maintaining peak ventilation performance requires addressing each major component of your kitchen chimney systematically. High-heat deep frying and heavy spice oil release fine particulate grease that settles across internal and external surfaces.
[ Daily ] [ Weekly ] [ Monthly ]
Surface Wipe-Down Auto-Clean Collector Baffle Filter Soak
│ │ │
▼ ▼ ▼
Remove Fresh Splatters Empty Accumulated Grease Degrease Metal Meshes
1. Daily Surface Maintenance
After cooking sessions involving heavy oils or spices, wipe down the exterior body, glass canopy, and touch control panel.
- Use a soft microfiber cloth dampened with mild liquid dish soap diluted in warm water.
- Avoid abrasive scrubbers or bleach-based sprays that scratch tempered glass surfaces or corrode stainless steel finishes.
- Dry the surface completely to prevent water spotting and streaks.
2. Weekly Oil Collector Cup Inspection
Cooker hood maintenance, Modern auto-clean units collect liquefied grease inside a detachable plastic or metal tray positioned beneath the motor housing.
- Slide out the collector cup carefully without tilting to prevent liquid oil spills.
- Pour out accumulated grease into a disposable container—never down the kitchen sink drain to avoid severe pipe blockages.
- Clean the cup with hot water and grease-cutting detergent before snapping it back into position.
3. Bi-Weekly Baffle and Mesh Filter Degreasing
Cooker hood maintenance Stainless steel baffle filters direct oil droplets into internal grooves, but heavy grease build-up gradually restricts airflow.
- Unlatch the filters from the canopy underside.
- Submerge filters in a basin filled with boiling water, baking soda (3 tablespoons), and concentrated dishwashing liquid for 30–45 minutes.
- Scrub gently with a nylon brush along the baffle ridges to release hardened deposits, then rinse with warm water and dry fully before reinstalling.
Understanding Filter Types and Maintenance Demands
Selecting and maintaining the correct filter mechanism is critical for long-term suction efficiency in Bangladeshi homes.
Cooker hood maintenance, Different filter designs manage grease particulates, smoke, and odors through distinct mechanical processes.
| Filter Type | Primary Function | Cleaning Frequency | Replacement Lifespan | Best Suited For |
| Stainless Steel Baffle | Traps heavy grease via curved airflow directional changes | Every 2 to 3 weeks | 5 to 10 Years (Durable) | Heavy oil frying, mustard oil cooking, high-heat grilling |
| Aluminum Mesh | Captures fine oil particles across multi-layer wire mesh | Every 7 to 10 days | 1 to 2 Years | Light boiling, steaming, low-oil meal prep |
| Activated Carbon | Neutralizes cooking odors in ductless recirculating setups | Cannot be washed | 3 to 6 Months | Apartments without external wall ducting holes |
Baffle Filters vs. Carbon Filters
Cooker Hood Maintenance Washable stainless steel baffle filters trap grease efficiently, drain oil, and withstand heavy daily cooking.
cooker hood maintenance replace carbon filters regularly; activated charcoal can’t be washed and loses effectiveness with water.
Check local availability for a kitchen hood filter price BD solution when planning routine carbon module replacements.
Troubleshooting Common Chimney and Hood Performance Issues

When a cooker hood exhibits loss of suction, excessive operational noise, or physical vibration, early diagnosis prevents permanent motor failure.
Loss of Suction Power
- Cause 1: Baffle filters saturated with hardened grease restriction paths.
- Fix: Perform a deep degreasing bath using hot water, caustic soda alternatives, or dish detergent.
- Cause 2: Flexible exhaust duct pipe obstructed or kinked behind cabinet walls.
- Fix: Inspect the duct hose for sharp 90-degree bends, crushed sections, or internal grease buildup.
- Cause 3: One-way check valve flap stuck in a closed or partially open position.
- Fix: Open the wall vent cover and clear debris preventing the butterfly damper from moving freely.
Excessive Motor Noise and Rattling
- Cause 1: Blower wheel fan out of balance due to uneven grease deposits on blades.
- Fix: Isolate power, detach the motor housing cover, and clean fan blades with a soft brush and degreaser.
- Cause 2: Loose mounting brackets or wall anchor bolts.
- Fix: Tighten wall anchors and canopy frame screws to prevent operational vibration against cabinet frames.
Integrating Ventilation into Modern Kitchen Layouts
Effective air extraction relies on how seamlessly your ventilation unit integrates into the surrounding cabinetry and cooking zones.
Cooker hood maintenance a balanced layout coordinates appliance placement, storage access, and air movement paths.
Stove and Hood Alignment
Cooker hood maintenance, Position the cooker hood directly over your primary heat source. Ensure the canopy width equals or slightly exceeds the gas stove burner footprint:
- Maintain a height of 24 to 30 inches between glass-top gas burners and the hood intake.
- Mounting lower risks heat damage to touch controls, while mounting higher reduces suction capture rate.
- Avoid placing high-velocity ceiling fans directly in line with the hood canopy, as cross-drafts disperse smoke before it reaches the intake zone.
Complementary Cabinet Accessories
A clean kitchen extends beyond the hood canopy. Pairing efficient ventilation with high-grade modular kitchen accessories BD helps maintain clutter-free counters near heat sources.
Cooker hood maintenance, Installing pull-out spice racks and under-sink storage baskets keeps cooking oils away from open flames, preventing accidental spills that degrade nearby surfaces.
Deep Cleaning vs. Professional Servicing Schedules
While routine filter maintenance can be handled at home, internal electrical components, motor impellers, and long duct runs require periodic professional inspection.
Daily Surface Wipe ──► Bi-Weekly Filter Soak ──► Semi-Annual Duct Check ──► Annual Motor Service
Self-Service Tasks (Home Maintenance)
- Cleaning exterior glass, stainless steel panels, and touchpads.
- Degreasing baffle filters and emptying oil collector cups.
- Wiping accessible internal grease channels beneath filter slots.
Professional Technician Servicing
Professional kitchen chimney cleaning Bangladesh services perform deep technical overhauls:
- Dismantling the internal motor housing and cleaning grease from the impeller fan blades.
- Flushing long flexible aluminum duct pipes or replacing damaged exhaust hoses.
- Testing electrical capacitor integrity, touch sensor sensitivity, and thermal auto-clean heating elements.
- Re-sealing wall outlet duct joints to eliminate exhaust leaks inside upper cabinets.
Step-by-Step Thermal Auto-Clean Activation Protocol
Thermal auto-clean technology simplifies internal motor maintenance by heating internal housing walls to melt trapped grease into the collector tray without manual dismantling.
1.Prepare the Appliance Unit:Power on the hood with burners off. Ensure the oil tray is clean, empty, and securely fitted.
2.Initiate Thermal Clean Mode:Hold Auto-Clean for 3 seconds to heat the motor and clean grease in 10–15 minutes.
3.Allow Grease Liquefaction:Heat melts hardened grease, directing liquefied oil through channels into the rear collection cup.
4.High-Speed Exhaust Blowout:cooker hood maintenance. After heating, the motor runs 1 minute at max speed to expel loosened grease.
5.Cool Down and Tray Disposal:Cool 10 mins, empty grease cup, wash with warm soapy water, dry, and reinsert for daily use.
Critical Installation and Maintenance Mistakes to Avoid
Avoiding operational mistakes ensures your kitchen ventilation setup operates at peak efficiency for years while minimizing repair costs.
- Applying harsh acids or concentrated caustic soda directly to exterior stainless steel or powder-coated aluminum causes permanent pitting, discoloration, and rusting.
- Operating the blower fan with filters removed draws airborne oil particles directly onto internal electrical components and motor bearings, causing premature motor burnout.
- Routing exhaust pipes with multiple 90-degree turns creates backpressure, reducing airflow capacity by up to 15% per bend and increasing motor noise.
- Leaving external wall outlet pipes exposed allows rain, birds, or insects to enter the duct hose, blocking air discharge paths.
Essential Cooker Hood Maintenance Checklist
Use this structured schedule to keep your kitchen exhaust system running at peak capacity year-round:
Daily Maintenance Tasks
- [ ] Wipe canopy exterior and glass control panel after cooking.
- [ ] Check that touch controls or motion sensors respond cleanly.
Monthly Maintenance Tasks
- [ ] Remove and soak stainless steel baffle filters in hot degreasing solution.
- [ ] Empty and sanitize the removable oil collection cup.
- [ ] Inspect visible duct connections inside cabinets for loose tape or grease drips.
Semi-Annual / Annual Maintenance Tasks
- [ ] Run the thermal auto-clean cycle (for supported models).
- [ ] Schedule professional inspection for internal motor cleaning and duct pipe flushing.
- [ ] Inspect outer wall gravity louvers or duct cap for obstructions.
Implementing these structured care steps preserves kitchen hygiene, maintains strong suction airflow, and protects your investment in modern kitchen appliances.
Next Steps & Resource Directories
Browse Full Directories
Related Articles
- how to clean a kitchen hood the Right Way
- Modern kitchen hood: Smart Storage for Every Kitchen Today
- Kitchen Hood Service: Clean, Safe, and Efficient Cooking
- Top Benefits of Kitchen Hood for a Cleaner Home Kitchen
